


5 out of 5

Rev-A-Shelf 447-BCBBSC-5C 447-BCBBSC-5C Tray Divider Pullout 5in Wide, Price/Each
* Click "Add to Cart" to calculate shipping and delivery time.
Product Description
Price is for Each.
Manufacturer Part Number: 447-BCBBSC-5C
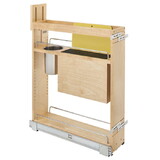
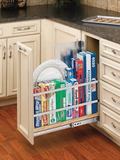
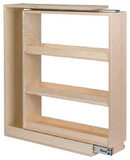
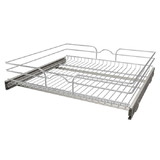
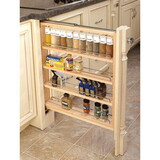
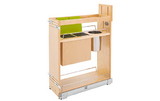
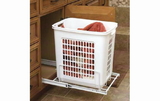
Rev-A-Shelf Pullout Tray Divider
These organizers feature two compartments for storing baking sheets and platters and the removable center racks allow the user the ability to store larger platters and bake ware
Screws Included
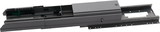
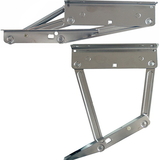
Ball Bearing Slides with Soft Close

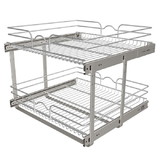
Rev-A-Shelf Pullout Tray Divider
These organizers feature two compartments for storing baking sheets and platters and the removable center racks allow the user the ability to store larger platters and bake ware
- 150 lb heavy duty full extension ball bearing slides or Blum TANDEM full extension undermount slides
- Removable center rack
- Included T-Bars allow you to customize your storage configuration (see applications link)
- 2 sizes available
- Door mount brackets provide 5" of side to side adjustment to ensure that screws mount into door stiles
Screws Included
Ball Bearing Slides with Soft Close
| Product SKU | Color | Size | Unit |
| 447-BCBBSC-5C Similar to # RS447.BC.5C | Maple | 5" W x 21-1/2" D x 19-1/2" H | EA |

 Attention CA Residents: Prop 65 Warning
WARNING:
This product can expose you to chemicals which are known to the State of California to cause cancer, birth defects, or other reproductive harm. For more information, go to www.p65warnings.ca.gov.
Return Policy
We do not accept returns if the product has been tried to be installed.
Need more information?
Our staff are available to answer any questions you may have about this item
Our staff are available to answer any questions you may have about this item
Look Similar Items By Category
Customer Reviews
By Donna M Geigler
Date: October 01, 2022
Construction is excellent. It was just alot smaller than expected. The middle bar really impedes storage.
Rating:  [4 of 5 Stars!]
[4 of 5 Stars!]
By Andrew M
Date: June 12, 2022
This is solidly built hardware that works well and I expect to work for years to come, if a little expensive. My ONLY real challenge is with the instructions. While the list of things you need to have includes a 3/32 drill bit, it very clearly, in two places, says to use a 5/32 drill bit. Unfortunately if (like me) you followed the instructions (which included a great template to make sure you drilled the holes in just the right spot) you now have holes way too big for the included screws. I had to go to the hardware store to find bigger screws. Also shorter screws because the included 3/4 screws would have stuck out the bottom of my cabinets. With the larger screws this now works beautifully.
Rating: [4 of 5 Stars!]
[4 of 5 Stars!]
By Tom In Bucks County
Date: June 28, 2021
The product is every bit as well built as other reviews claim -- you get what you pay for in that regard. And they did think of a lot of details, though not every detail. So once it gets from the box to a finished installation, you will be happy. The problem is that little matter of installing it. I was fortunate enough to install mine in an island before the countertop was installed. I have no idea how you would do it otherwise, but let's disregard that for now. The 30 minute installation is a bit of a joke. Unless you've done it before, count on at least three hours.The product arrives with the business end attached to the sliding base. So your first job is to detach the latter from the former. They provide some unclear instructions for how to do this. It is vaguely similar to removing drawers with ball bearing slides, but more difficult. The latches are much more difficult to find and manipulate. If, like me, you have to remove it again after installation (more in a moment), forget about it. Just remove the whole unit in that case.So figure on 45 minutes and some sore fingers just to disassemble the top from the bottom. Once you succeed, it's time to install the bottom in the cabinet. They do provide a template, which is helpful. Take your time to get it positioned straight and properly, then mark your holes. Remove the template, drill the front holes and install the two front screws. In my case that was difficult because the screws were missing. No big deal, if like me you're a pack rat and have a hardware store in your garage. Anyway, when you're done with the front, recheck for straightness, then drill and install the two back screws.The next step is difficult and I messed it up. It's time to slide the top onto the base that you just installed. And it has to be right. In my case I did not engage the middle slider properly, and the unit didn't slide properly. After much fiddling, I realized that I needed to disassemble the top from the base and try again. Unfortunately, this is next to impossible. Much easier to pull the top out as far as it will go, then remove the four base screws that you installed, and then work with the unit outside of the cabinet. Once you resolve the slider situation (if you had a slider situation), just reinstall it.Once the unit is installed and sliding properly, you can set the stops in the back that prevent the unit from sliding out too far. And they also give you guides, which install on the inner face of the cabinet opening. Nice touches, don't neglect them.If all is well, you can install the cabinet door. This is easy in principle, but it is very difficult in practice to get it exact. They do provide adjustments in the Z direction (into the front plane of the cabinet). But it is very hard to adjust in the X and Y axes. So, basically, take your time and drill the holes in the cabinet door carefully because you only get one shot (well, technically I guess you could get two by turning the door upside down).If you have not bought the unit, I would mention two other issues that are not issues with the product, but issues with my own planning. First, if you plan to install one of these things, order a door without hinges. It's a waste, and visually unappealing, to have a door with hinge installation sockets on the inside face. Second, it's a shame in general to have to install a 5 unit into a 9 cabinet. So, again, choose your cabinet geometry carefully ahead of time. In the end, this is a very well-built product that you won't regret owning. But plan ahead on the cabinet design, and plan on a challenging installation.
Rating: [4 of 5 Stars!]
[4 of 5 Stars!]
By Susan Bramlett
Date: May 05, 2021
Works great you will loose some storage space for the convenience of being able to pull out. All in all is very sturdy. Can take some time to install and prep and I build things for a living. Was missing a few mounting screws which was not a problem for me as I have extras laying around.
Rating: [4 of 5 Stars!]
[4 of 5 Stars!]
By Jill H.
Date: May 01, 2021
Love all rev a shelf units. Always tricky to install but so worth it. I remodeled my kitchen and had my contractor out this in for me
Rating: [4 of 5 Stars!]
[4 of 5 Stars!]
By Kim L.
Date: March 11, 2021
Installed in an island my husband built. Well made, worked great
Rating: [4 of 5 Stars!]
[4 of 5 Stars!]