skip to footer block
JEN Jensen Swing ScoopC Scoop Slide Top & Bottom Overseas P10019543JEN-SCOOPCB https://cdnimages.opentip.com/full/JEN/JEN-SCOOPC.jpg Jensen Swing ScoopC Scoop Slide Top & Bottom Overseas Our rotational molded scoop slide can be shipped UPS. The entrance is 22.25\" x 27\" x 14.5\" and weighs 15 lbs. The exit is 42\" x 30\" x 22\" and weighs 28 lbs. The height of the seat from the ground is 8.5\". Additional inserts can be added to lengthen the slide. If the deck height is more than 10\' the slide should be going down a hillside only. This product does not come with the supports shown in the pictures. This product should last 2 years in harsh conditions and up to 5 years in optimal conditions. Some conditions may require replacement sooner. The weight limit is 300 lbs.See Colored Installation Instruction under Resources - Scoop Slide Installation Commercial NEWDeck HeightSlide LengthSlide + InsertsHardware Sent with Order3\'65\"1 Top + 1 Bottom + 1 Insert8 Bolts - 8 Nuts - 6 Plugs - 16 Washers4\'83\"1 Top + 1 Bottom + 2 Insert12 Bolts - 12 Nuts - 9 Plugs - 24 Washers5\'100\"1 Top + 1 Bottom + 3 Insert16 Bolts - 16 Nuts - 12 Plugs - 32 Washers6\'117\"1 Top + 1 Bottom + 4 Insert20 Bolts - 20 Nuts - 15 Plugs - 40 Washers7\'135\"1 Top + 1 Bottom + 5 Insert24 Bolts - 24 Nuts - 18 Plugs - 48 Washers8\'175\"1 Top + 1 Bottom + 7 Insert32 Bolts - 32 Nuts - 24 Plugs - 64 Washers9\'192\"1 Top + 1 Bottom + 8 Insert36 Bolts - 36 Nuts - 27 Plugs - 72 Washers10\'210\"1 Top + 1 Bottom + 9 Insert40 Bolts - 40 Nuts - 30 Plugs - 80 WashersThese lengths and deck heights are suggestions, as all slides should be between 30° and 45° and cannot exceed 50° at any given point.Colors: Blue or GreenThis is for children 2 - 12 years old only. Adults should supervise children at all times. Do not allow children to stand on or use unsafely. Do not allow it to be used if damaged. Instruct children to never run up the slide and to slide down feet first.IMPORTANT: Please read for important information. In this material we have tried to provide some requirements stated in the CPSC Handbooks, ASTM F2373-11, F1487-11 and F1148-09. However, we in no way intend for this to be a complete list of requirements. Also these publications are updated frequently with changes therefore, you should read these publications yourself to determine if any part or installation could prove a danger to a child.To help keep children safe from harm, review installation and maintenance instructions before installing equipment. Our website also has a \"Product Testing Information\" page. All products are tested for lead, phthalates and tensile strength. Due to the thermo dynamics and lower heat transfer properties of plastics, plastic slides are preferred over metal slides for play equipment. Although plastic slides may become as hot as metal, they insulate better and don\'t transfer the heat as quickly. Because of these properties, the Consumer Product Safety Commission (CPSC) recommends plastic slides and plastic surfaces over bare metal.Regardless of lower heat transfer properties, plastic play equipment can still become hot enough -- in extreme temperatures and direct sunlight -- to cause burns. Plastic slides are safe, tried and true, but as is the case with all playground equipment, parents and supervisors must monitor the children in their care, make certain that the equipment is appropriate for their age, and always check playground surfaces for excessive heat before allowing children to play. For more information, contact IPEMA headquarters at www.communications@ipema.org or by calling 1-717-238-1744.WARNING:Instruct children to never run up the slide and to slide down feet first. Tell children to make sure the bottom of the slide is unobstructed before going down the slide. Do not use slide when wet. Do not use equipment until fully assembled. Consider proper drainage and place slide in shaded area or located out of direct sun. Slides exposed to intense sun can burn.No span of the sliding surface should have a slope that exceeds .577 degrees. Handrails or other means of hand support should be installed at the slide chute entrance to make it easy for children to go from standing to sitting. There should be guard rails to transit the child into the slide chute. The transition platform should be as wide as or wider than the slide entrance.Installations: Our parts are sold as either replacement parts or components of a set, unless you are buying our Metal Frame Set, therefore these parts need to be installed according to the sets installation instructions.For color pictures of this installation go to Resources on our website. Place all scoop slide sections upside down on a flat surface. Install the alignment plugs on all sections in between the slide pieces.Starting from the Top section, insert four bolts through the Top and first Insert section, and tighten all four bolts evenly. (It is recommended that thread locker is used on all bolts to ensure the connections do not loosen up over time.)Repeat across all of the inserts. Recheck all of the connections and tighten if needed.When you are ready to join the bottom piece, you will need to raise the two pieces for proper alignment. This can be accomplished with a wood block, raising the slide approximately 4 to 5 inches. Once all of the connections have been completed, recheck all of the connections and tighten if needed.Turn the slide over and lift into place. (Use proper lifting techniques to avoid injury. A second person might be required, depending on length and height of the slide.)There are four predrilled holes in the Top section to fasten the slide to the platform. This connection can be accomplished with lag bolts or through bolts (not included). It is recommended to predrill the holes to avoid splitting the wood of the platform.Depending on the length of the slide you will need to install support brackets. For a 5\' platform, put support on the first insert piece from the bottom. For a 7\' platform put supports on the first and third from the bottom. For a 9\' platform put supports on the first, third and fifth from the bottom.Retighten the bolts, and adjust the brackets to firmly place them against the ground. The ground should be packed and level to avoid sinking. Anchor the supports to the ground. (Anchors not included)Recheck all connections and tighten if needed. Fill any small gaps in the slide with silicone sealant and let dry before use. This will prevent any gaps in which clothing or fingers could get caught.Maintenance: At beginning and end of each play season and once a month during play season, check for cracks in plastic, paying particular attention to the top of slide where attached to platform. Check for rusty screws, missing or loose hardware or evidence of vandalism. Check for cracks in wood or splinters. Replace parts as necessary. Make sure there are no exposed footings, anchoring devices, rocks, roots, holes or any other obstacles in or around the slide. Maintain detailed inspection and maintenance records for public-use playground equipment.Any damage from vandalism, abuse or misuse VOIDS all warranties. Weight (lbs) 43 Dimensions (in) 27 X 27 X 41 in At the top of the side it is 16 ½\" and the bottom of the slide is 10 ½\" 10019543 519.3900lbs 36.00 36.00 48.00
Jensen Swing
420.65 2025-04-25 24 In Stock

Jensen Swing ScoopC - Scoop Slide Top & Bottom - Overseas

Brand Jensen Swing
Shop more from JEN

SKU: JEN-SCOOPC
Price: $420.65
Colors:
Quantity:
Shipping:
$539.07 To [ 43215 ] Estimated Delivery Date: May 20, 2024 to May 22, 2024
24 In Stock
Share & Earn 10% Cash Back Best Price in Bulk

Customer also purchased

Product Description

Our rotational molded scoop slide can be shipped UPS. The entrance is 22.25" x 27" x 14.5" and weighs 15 lbs. The exit is 42" x 30" x 22" and weighs 28 lbs. The height of the seat from the ground is 8.5". Additional inserts can be added to lengthen the slide. If the deck height is more than 10' the slide should be going down a hillside only. This product does not come with the supports shown in the pictures. This product should last 2 years in harsh conditions and up to 5 years in optimal conditions. Some conditions may require replacement sooner. The weight limit is 300 lbs.

See Colored Installation Instruction under Resources - Scoop Slide Installation Commercial NEW

These lengths and deck heights are suggestions, as all slides should be between 30° and 45° and cannot exceed 50° at any given point.

Colors: Blue or Green

This is for children 2 - 12 years old only. Adults should supervise children at all times. Do not allow children to stand on or use unsafely. Do not allow it to be used if damaged. Instruct children to never run up the slide and to slide down feet first.

IMPORTANT: Please read for important information. In this material we have tried to provide some requirements stated in the CPSC Handbooks, ASTM F2373-11, F1487-11 and F1148-09. However, we in no way intend for this to be a complete list of requirements. Also these publications are updated frequently with changes therefore, you should read these publications yourself to determine if any part or installation could prove a danger to a child.

To help keep children safe from harm, review installation and maintenance instructions before installing equipment. Our website also has a "Product Testing Information" page. All products are tested for lead, phthalates and tensile strength.

Due to the thermo dynamics and lower heat transfer properties of plastics, plastic slides are preferred over metal slides for play equipment. Although plastic slides may become as hot as metal, they insulate better and don't transfer the heat as quickly. Because of these properties, the Consumer Product Safety Commission (CPSC) recommends plastic slides and plastic surfaces over bare metal.

Regardless of lower heat transfer properties, plastic play equipment can still become hot enough -- in extreme temperatures and direct sunlight -- to cause burns. Plastic slides are safe, tried and true, but as is the case with all playground equipment, parents and supervisors must monitor the children in their care, make certain that the equipment is appropriate for their age, and always check playground surfaces for excessive heat before allowing children to play. For more information, contact IPEMA headquarters at www.communications@ipema.org or by calling 1-717-238-1744.

WARNING:

Instruct children to never run up the slide and to slide down feet first. Tell children to make sure the bottom of the slide is unobstructed before going down the slide. Do not use slide when wet. Do not use equipment until fully assembled. Consider proper drainage and place slide in shaded area or located out of direct sun. Slides exposed to intense sun can burn.

No span of the sliding surface should have a slope that exceeds .577 degrees. Handrails or other means of hand support should be installed at the slide chute entrance to make it easy for children to go from standing to sitting. There should be guard rails to transit the child into the slide chute. The transition platform should be as wide as or wider than the slide entrance.

Installations: Our parts are sold as either replacement parts or components of a set, unless you are buying our Metal Frame Set, therefore these parts need to be installed according to the sets installation instructions.

For color pictures of this installation go to Resources on our website.

Place all scoop slide sections upside down on a flat surface. Install the alignment plugs on all sections in between the slide pieces.

Starting from the Top section, insert four bolts through the Top and first Insert section, and tighten all four bolts evenly. (It is recommended that thread locker is used on all bolts to ensure the connections do not loosen up over time.)

Repeat across all of the inserts. Recheck all of the connections and tighten if needed.

When you are ready to join the bottom piece, you will need to raise the two pieces for proper alignment. This can be accomplished with a wood block, raising the slide approximately 4 to 5 inches. Once all of the connections have been completed, recheck all of the connections and tighten if needed.

Turn the slide over and lift into place. (Use proper lifting techniques to avoid injury. A second person might be required, depending on length and height of the slide.)

There are four predrilled holes in the Top section to fasten the slide to the platform. This connection can be accomplished with lag bolts or through bolts (not included). It is recommended to predrill the holes to avoid splitting the wood of the platform.

Depending on the length of the slide you will need to install support brackets. For a 5' platform, put support on the first insert piece from the bottom. For a 7' platform put supports on the first and third from the bottom. For a 9' platform put supports on the first, third and fifth from the bottom.

Retighten the bolts, and adjust the brackets to firmly place them against the ground. The ground should be packed and level to avoid sinking. Anchor the supports to the ground. (Anchors not included)

Recheck all connections and tighten if needed. Fill any small gaps in the slide with silicone sealant and let dry before use. This will prevent any gaps in which clothing or fingers could get caught.

Maintenance: At beginning and end of each play season and once a month during play season, check for cracks in plastic, paying particular attention to the top of slide where attached to platform. Check for rusty screws, missing or loose hardware or evidence of vandalism. Check for cracks in wood or splinters. Replace parts as necessary. Make sure there are no exposed footings, anchoring devices, rocks, roots, holes or any other obstacles in or around the slide. Maintain detailed inspection and maintenance records for public-use playground equipment.

Any damage from vandalism, abuse or misuse VOIDS all warranties.


At the top of the side it is 16 ½" and the bottom of the slide is 10 ½"


This item is oversize. we may contact you when we process the order.

warning tips WARNING: This product can expose you to chemicals which are known to the State of California to cause cancer, birth defects, or other reproductive harm. For more information, go to www.p65warnings.ca.gov.
Need more information?
Our staff are available to answer any questions you may have about this item


Customer Reviews
0 reviews
Be the first to review this item!
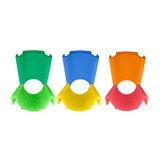