skip to footer block
JEN Jensen Swing S82 Standard 8' High 2 Swing 1 Bay Residential Only P5929549JEN-S82 https://cdnimages.opentip.com/full/JEN/JEN-S82.jpg Jensen Swing S82 Standard 8' High 2 Swing 1 Bay Residential Only This set is very heavy duty. Each bay is designed for two children up to 12 years old, per ASTM and CPSC guidelines. If installed according to installation instructions, our sets will more than meet these requirements.Actual weight limits depend upon how the set is installed, the amount of concrete, the type of dirt in which the set is installed, how much use, etc. Therefore, we do not state weight limits for our swing sets.This an in ground 8\' high set with two Residential Swing Seats. You will need to specify colors for the End Frame Fittings, Chains, and Swing Seats. This product should last 2 years in harsh conditions and up to 5 years in optimal conditions. Some conditions may require replacement sooner.TOOLS AND PARTS NEEDED:Ladder, ¾\" wrench, Ratchet socket wrench, Tape measure, H175 supplied Allen wrench for shackles, and 6mm Allen wrench for set screws. Stakes for marking holes. Shovel, Bricks, Gravel, Wheelbarrow for mixing concrete, Water, Concrete, Trowel, Level, Warning signs. Protective surfacing according to ASTM F1292 for a fall height of 8\'.PARTS INCLUDED ARE:EFF2 - End Frame Fittings (2) / SH114 - Shackle Swing Hangers (4) / H172 - Shackles for Swings (4) / H175 - Wrench for Shackles (1) / S181 -Swing Residential (2) / C127 - 5 1/2\' Coated Chain (4) / Lpipe - Pipe for Legs 138\" Long (4) / Tpipe - Pipe for Top Rail 10\' Long (1)MEASUREMENTS FOR SWING FRAME:The legs are 203\" apart lengthwise at ground level. The legs are 93\" wide at ground level. Below ground, the legs are 220\" lengthwise and the width below ground is 115\". Height is 8\'**INSTALLATION, SAFE USE & MAINTENANCE INSTRUCTIONS**IMPORTANT: To keep children safe from harm, follow these precautions and instructions when installing, using, or maintaining this playground equipment. Installation: Read all instructions before attempting assembly. To determine proper use zones needed for swing set consult Figure 23, Table 7 for commercial swing sets if upgrading to a commercial swing. For residential sets see spacing dimensions on Page 4 of the Outdoor Home Playground Safety Handbook. Install swing set where a child can easily be supervised. Do not install playground equipment over concrete, asphalt, or any other hard surface. A fall onto a hard surface can result in serious injury to the equipment user. Grass and dirt are not considered protective surfacing because wear and environmental factors can reduce their shock absorbing effectiveness. Carpeting and thin mats are generally not adequate protective surfacing. Install your play equipment on level ground with adequate surfacing and anchoring. Use proper hardware, and tighten all connections.Lay out all the pipes and end frame fittings on the ground about two feet from where you have determined you want to place your swing set. Do not dig holes until frame is assembled, as there may be some variance in leg spacing.Slide the two end frame fittings on each end of the top pole with the two legs of the end frame fittings, pointing down. You may have to force pipes into end pipe openings. Tighten the two included set screws on the top of each of the end frame fitting, using the 6mm Allen wrench. Attach swing hangers. The hangers should be spaced 2 ft from the end of the set and 2 ft apart. Place the two halves of the hanger around the top rail of the swing set. The swinging shackle pendulum will be facing downwards. The side bolts are placed with the heads on the top of the hanger and the threads facing downwards with the nuts on the bottom. Using a ratchet socket wrench and with no more than 50 lbs. of torque, tighten the side bolts. After tightening, the threads should not be showing more than two threads past the nut, and the hanger should fit snuggly on the pipe. Grease or oil bushings if squeaking noises are heard. Use the H175 to open shackle bolt on the bottom of the shackle pendulum. Slide chain on the bolt and then tighten in the hanger until snug. You may have to force bolt through coating on chain. Close according to Figure A1.19 for Fastening Devices.You can now attach a swing to the bottom of the chain with shackles. This swing is intended for children four years to twelve years old. This swing must be installed a minimum of twelve inches from resilient surfacing. Warning on swing seat should face upward, so that the warning can be read easily. Measure each side of swing chain, so the swing hangs evenly. WARNING: THIS SWING REQUIRES EITHER A LARGE END S-HOOK OR AN H-SHACKLE TO CONNECT SWING TO CHAIN. NOT USING NAMED FASTENERS CAN RESULT IN SEAT BREAKING AND CHILD BEING INJURED. Attach the large end of h-shackle through round hole on each end of swing seat, and then attach small part of h-shackle to chain. Close according to Figure A1.19 for Fastening Devices. Try swinging seat without child in it first to make sure everything is working correctly before placing child in seat. This swing is intended for use by only one child at a time. The use zone for a belt swing should extend to the front and rear of a single-axis swing a minimum distance of twice the vertical distance from the pivot point and the top of the protective surface beneath it. Attach the second swing two feet further on the pipe using the same method as the first swing.After attaching swings to the pipe, slide the frame leg poles into each leg of the end frame fitting and tighten the included set screws for each leg. The set screws use a 6 millimeter Allen wrench. Make sure set screws are tight. Make sure that pipes are all far enough in frame fittings holes to stabilize frame. After frame is all assembled, have multiple people lift structure and rotate structure, so that it is upright.Measure distances between legs, then, drive stakes into the ground at the correct distances for each pipe at the location of the swing set as you have determined above. Dig holes until you have the correct number of holes. Dig holes that are two feet deep and two feet in diameter.Place a brick in the bottom of each hole with the widest edge facing up. The bricks will prevent the swing set from sinking in the dirt. Set the swing set in place. Lift the set and do not drag. Make sure there is at least four inches of space around the entire end of pipe, so that concrete will surround the pipe. Hold a level on the top bar of the swing set. Add gravel under each brick to adjust the height as needed.Pour the contents of two 80-lb. bag of concrete into the wheelbarrow. Add the recommended amount of water to the concrete, and mix with the shovel until there is no dry material. Shovel the mixed concrete into a hole. Smooth the concrete with a trowel. Add dirt if necessary to fill hole, leaving enough space for surfacing. Repeat this step for each hole. Allow the concrete to dry for twenty-four hours, and check for sturdiness before allowing children to use swing set. Try swinging seat without child in it first to make sure everything is working correctly before placing child in seat.Before allowing children to use set, install adequate surfacing under swing sets to prevent injury from falls. Protective surfacing that meets ASTM F1292 must be installed under swing set and extends at least six feet from the sides of the set and twice the height of the top bar in the front and back of swing set. Protective surfacing is one of the most important things that you can do to reduce the likelihood of serious injuries.The new CPSC standard states the owner/operator of the swing set needs to post warning signs outside the use zone that are readily visible to the intended viewer and alert them to the potential hazard in time to take appropriate action. This message may be on either a sign or label outside the use zone. Signs should be posted that state the appropriate age group for the swing set.Not for Adults. Adults should supervise children at all times. Do not allow children to stand on or use unsafely. Do not allow set to be used if damaged. Remove helmets, drawstrings or accessories around the neck which are all known to create head entrapment or entanglement hazards. Where applicable, hot play surfaces are known to reach temperatures high enough to cause serious burns to children generally less than 4 years of age.Specifications for all warning signs or labels should conform to ANSI Z535.1 and ANSI Z535.1 or ANSI Z535.1 in the following areas: legibility, type of lettering, clarity of message and symbol, color specifications and work message and visibility. The labels or signs should be durable and conform to UL 969. It has been and continues to be the responsibility of the owner/operator to replace signs or labels or both should they become illegible, destroyed or removed. Safe Use: This seat is for children 4-12 years old only. Not for Adults. Adults should supervise children at all times. Do not allow children to stand or kneel on seat or use unsafely. Do not allow swing to be used if damaged. Do not use if wet. Instruct children not to wrap chains around top beam or twist chains. Tell children to watch for children and adults standing, walking or running close to moving swings and to stop swinging to avoid hitting them and causing injury. Tell children to hold chains tightly in each hand while swinging. Tell children not to get off swing until it has stopped completely.Maintenance: At beginning and end of each play season and once a month during play season, check for sharp edges on hardware and/or cracks in swings or other accessories. Check that set screws are tight on frame fittings. Check that frame is sturdy and does not rock from side to side or rock to or fro. Make sure concrete is still secure and that footing surface is not a tripping hazard. Check for rusty or worn chain. Check to make sure shackles are closed properly. Check to see if oil lite bearing in swing hanger pendulum is worn or cracking. When worn or cracked, replace pendulum. Check to make sure all lock nuts are tight. Check that screws are secure. Check for rust. Take a wire brush or piece of steel wool and scrub rust from metal surfaces. Please, check for vandalism. Replace parts if necessary. Check resilient surfacing for appropriate depth and cleanliness. Maintaining adequate surfacing is extremely important in reducing injuries. Maintain detailed inspection and maintenance records for public-use playground equipment.Any damage from vandalism, abuse or misuse VOIDS all warranties. 5929549 573.7900lbs 23.00 20.00 142.00
Jensen Swing
1134.0000 2025-04-23 5 In Stock

Jensen Swing S82 - Standard 8' High - 2 Swing - 1 Bay - Residential Only

Brand Jensen Swing
Shop more from JEN

SKU: JEN-S82
Price: $1,134.00
Quantity:
Shipping:
$595.54 To [ 43215 ] Estimated Delivery Date: May 16, 2024 to May 20, 2024
5 In Stock
Share & Earn 10% Cash Back Best Price in Bulk

Product Description

This set is very heavy duty. Each bay is designed for two children up to 12 years old, per ASTM and CPSC guidelines. If installed according to installation instructions, our sets will more than meet these requirements.

Actual weight limits depend upon how the set is installed, the amount of concrete, the type of dirt in which the set is installed, how much use, etc. Therefore, we do not state weight limits for our swing sets.


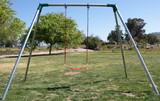
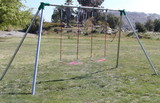
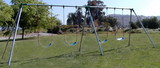
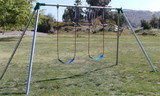
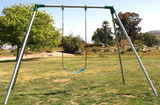
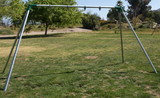
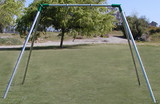
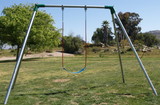
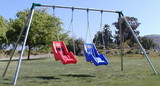
This an in ground 8' high set with two Residential Swing Seats. You will need to specify colors for the End Frame Fittings, Chains, and Swing Seats. This product should last 2 years in harsh conditions and up to 5 years in optimal conditions. Some conditions may require replacement sooner.

TOOLS AND PARTS NEEDED:

Ladder, ¾" wrench, Ratchet socket wrench, Tape measure, H175 supplied Allen wrench for shackles, and 6mm Allen wrench for set screws. Stakes for marking holes. Shovel, Bricks, Gravel, Wheelbarrow for mixing concrete, Water, Concrete, Trowel, Level, Warning signs. Protective surfacing according to ASTM F1292 for a fall height of 8'.

PARTS INCLUDED ARE:

EFF2 - End Frame Fittings (2) / SH114 - Shackle Swing Hangers (4) / H172 - Shackles for Swings (4) / H175 - Wrench for Shackles (1) / S181 -Swing Residential (2) / C127 - 5 1/2' Coated Chain (4) / Lpipe - Pipe for Legs 138" Long (4) / Tpipe - Pipe for Top Rail 10' Long (1)

MEASUREMENTS FOR SWING FRAME:

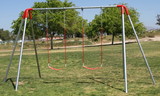
The legs are 203" apart lengthwise at ground level. The legs are 93" wide at ground level. Below ground, the legs are 220" lengthwise and the width below ground is 115". Height is 8'

**INSTALLATION, SAFE USE & MAINTENANCE INSTRUCTIONS**

IMPORTANT: To keep children safe from harm, follow these precautions and instructions when installing, using, or maintaining this playground equipment.

Installation: Read all instructions before attempting assembly. To determine proper use zones needed for swing set consult Figure 23, Table 7 for commercial swing sets if upgrading to a commercial swing. For residential sets see spacing dimensions on Page 4 of the Outdoor Home Playground Safety Handbook. Install swing set where a child can easily be supervised. Do not install playground equipment over concrete, asphalt, or any other hard surface. A fall onto a hard surface can result in serious injury to the equipment user. Grass and dirt are not considered protective surfacing because wear and environmental factors can reduce their shock absorbing effectiveness. Carpeting and thin mats are generally not adequate protective surfacing. Install your play equipment on level ground with adequate surfacing and anchoring. Use proper hardware, and tighten all connections.

Lay out all the pipes and end frame fittings on the ground about two feet from where you have determined you want to place your swing set. Do not dig holes until frame is assembled, as there may be some variance in leg spacing.

Slide the two end frame fittings on each end of the top pole with the two legs of the end frame fittings, pointing down. You may have to force pipes into end pipe openings. Tighten the two included set screws on the top of each of the end frame fitting, using the 6mm Allen wrench. Attach swing hangers. The hangers should be spaced 2 ft from the end of the set and 2 ft apart. Place the two halves of the hanger around the top rail of the swing set. The swinging shackle pendulum will be facing downwards. The side bolts are placed with the heads on the top of the hanger and the threads facing downwards with the nuts on the bottom. Using a ratchet socket wrench and with no more than 50 lbs. of torque, tighten the side bolts. After tightening, the threads should not be showing more than two threads past the nut, and the hanger should fit snuggly on the pipe. Grease or oil bushings if squeaking noises are heard. Use the H175 to open shackle bolt on the bottom of the shackle pendulum. Slide chain on the bolt and then tighten in the hanger until snug. You may have to force bolt through coating on chain. Close according to Figure A1.19 for Fastening Devices.

You can now attach a swing to the bottom of the chain with shackles. This swing is intended for children four years to twelve years old. This swing must be installed a minimum of twelve inches from resilient surfacing. Warning on swing seat should face upward, so that the warning can be read easily. Measure each side of swing chain, so the swing hangs evenly. WARNING: THIS SWING REQUIRES EITHER A LARGE END S-HOOK OR AN H-SHACKLE TO CONNECT SWING TO CHAIN. NOT USING NAMED FASTENERS CAN RESULT IN SEAT BREAKING AND CHILD BEING INJURED. Attach the large end of h-shackle through round hole on each end of swing seat, and then attach small part of h-shackle to chain. Close according to Figure A1.19 for Fastening Devices. Try swinging seat without child in it first to make sure everything is working correctly before placing child in seat. This swing is intended for use by only one child at a time. The use zone for a belt swing should extend to the front and rear of a single-axis swing a minimum distance of twice the vertical distance from the pivot point and the top of the protective surface beneath it. Attach the second swing two feet further on the pipe using the same method as the first swing.

After attaching swings to the pipe, slide the frame leg poles into each leg of the end frame fitting and tighten the included set screws for each leg. The set screws use a 6 millimeter Allen wrench. Make sure set screws are tight. Make sure that pipes are all far enough in frame fittings holes to stabilize frame. After frame is all assembled, have multiple people lift structure and rotate structure, so that it is upright.

Measure distances between legs, then, drive stakes into the ground at the correct distances for each pipe at the location of the swing set as you have determined above. Dig holes until you have the correct number of holes. Dig holes that are two feet deep and two feet in diameter.

Place a brick in the bottom of each hole with the widest edge facing up. The bricks will prevent the swing set from sinking in the dirt. Set the swing set in place. Lift the set and do not drag. Make sure there is at least four inches of space around the entire end of pipe, so that concrete will surround the pipe. Hold a level on the top bar of the swing set. Add gravel under each brick to adjust the height as needed.

Pour the contents of two 80-lb. bag of concrete into the wheelbarrow. Add the recommended amount of water to the concrete, and mix with the shovel until there is no dry material. Shovel the mixed concrete into a hole. Smooth the concrete with a trowel. Add dirt if necessary to fill hole, leaving enough space for surfacing. Repeat this step for each hole. Allow the concrete to dry for twenty-four hours, and check for sturdiness before allowing children to use swing set. Try swinging seat without child in it first to make sure everything is working correctly before placing child in seat.

Before allowing children to use set, install adequate surfacing under swing sets to prevent injury from falls. Protective surfacing that meets ASTM F1292 must be installed under swing set and extends at least six feet from the sides of the set and twice the height of the top bar in the front and back of swing set. Protective surfacing is one of the most important things that you can do to reduce the likelihood of serious injuries.

The new CPSC standard states the owner/operator of the swing set needs to post warning signs outside the use zone that are readily visible to the intended viewer and alert them to the potential hazard in time to take appropriate action. This message may be on either a sign or label outside the use zone. Signs should be posted that state the appropriate age group for the swing set.Not for Adults. Adults should supervise children at all times. Do not allow children to stand on or use unsafely. Do not allow set to be used if damaged. Remove helmets, drawstrings or accessories around the neck which are all known to create head entrapment or entanglement hazards. Where applicable, hot play surfaces are known to reach temperatures high enough to cause serious burns to children generally less than 4 years of age.

Specifications for all warning signs or labels should conform to ANSI Z535.1 and ANSI Z535.1 or ANSI Z535.1 in the following areas: legibility, type of lettering, clarity of message and symbol, color specifications and work message and visibility. The labels or signs should be durable and conform to UL 969. It has been and continues to be the responsibility of the owner/operator to replace signs or labels or both should they become illegible, destroyed or removed.

Safe Use: This seat is for children 4-12 years old only. Not for Adults. Adults should supervise children at all times. Do not allow children to stand or kneel on seat or use unsafely. Do not allow swing to be used if damaged. Do not use if wet. Instruct children not to wrap chains around top beam or twist chains. Tell children to watch for children and adults standing, walking or running close to moving swings and to stop swinging to avoid hitting them and causing injury. Tell children to hold chains tightly in each hand while swinging. Tell children not to get off swing until it has stopped completely.

Maintenance: At beginning and end of each play season and once a month during play season, check for sharp edges on hardware and/or cracks in swings or other accessories. Check that set screws are tight on frame fittings. Check that frame is sturdy and does not rock from side to side or rock to or fro. Make sure concrete is still secure and that footing surface is not a tripping hazard. Check for rusty or worn chain. Check to make sure shackles are closed properly. Check to see if oil lite bearing in swing hanger pendulum is worn or cracking. When worn or cracked, replace pendulum. Check to make sure all lock nuts are tight. Check that screws are secure. Check for rust. Take a wire brush or piece of steel wool and scrub rust from metal surfaces. Please, check for vandalism. Replace parts if necessary. Check resilient surfacing for appropriate depth and cleanliness. Maintaining adequate surfacing is extremely important in reducing injuries. Maintain detailed inspection and maintenance records for public-use playground equipment.

Any damage from vandalism, abuse or misuse VOIDS all warranties.


NOTE: This item do not sell to a commercial entity.


This item is oversize. we may contact you when we process the order.

warning tips WARNING: This product can expose you to chemicals which are known to the State of California to cause cancer, birth defects, or other reproductive harm. For more information, go to www.p65warnings.ca.gov.
Need more information?
Our staff are available to answer any questions you may have about this item


Customer Reviews
0 reviews
Be the first to review this item!