


5 out of 5


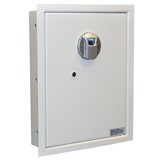
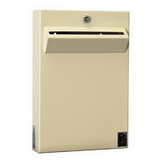
Protex PWS-1814E Electronic Wall Safe
* Click "Add to Cart" to calculate shipping and delivery time.
Product Description
Manufacturer Part Number: PWS-1814E
This safe is great for personal use at home or office. The PWS-1814E is equipped with a digital keypad for easy operation and maintenance.
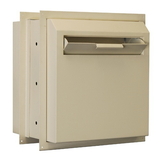
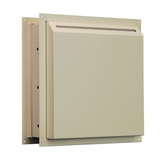
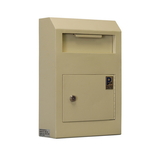
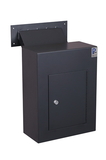
Electronic Hidden Wall SafeThis wall safe is an excellent choice for home, office, hotel, dorm or school use. Quick and convenient access, easy programing and can be installed at any height on interior wall. It's very easy to install between 2 wall studs. It comes with a velvet interior for a great plush look and feel. The keypad is flush with the safe's flange, therefore able you to hang a picture over the safe to conceal it from view. The door has a hidden lock to open the safe with a mechanical override key (2 included).This key is used only when batteries are dead or keypad is damaged.Since this safe is 4" to fit a standard wall between the studs. The safe is using 4x AA batteries and it includes a power override box to be able to power the safe from the outside when the battaries die. The door is spring loaded and will open by itself after the correct code is entered. After entering the correct code the motorized locking bolts will retract automaticly and the door will swing open.
Overview
User Manual
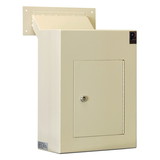
Click the image below to download the user manual
This safe is great for personal use at home or office. The PWS-1814E is equipped with a digital keypad for easy operation and maintenance.
Electronic Hidden Wall SafeThis wall safe is an excellent choice for home, office, hotel, dorm or school use. Quick and convenient access, easy programing and can be installed at any height on interior wall. It's very easy to install between 2 wall studs. It comes with a velvet interior for a great plush look and feel. The keypad is flush with the safe's flange, therefore able you to hang a picture over the safe to conceal it from view. The door has a hidden lock to open the safe with a mechanical override key (2 included).This key is used only when batteries are dead or keypad is damaged.Since this safe is 4" to fit a standard wall between the studs. The safe is using 4x AA batteries and it includes a power override box to be able to power the safe from the outside when the battaries die. The door is spring loaded and will open by itself after the correct code is entered. After entering the correct code the motorized locking bolts will retract automaticly and the door will swing open.
Overview
- Burglary Resistant wall safe with digital electronic locking system
- High quality VELVET INTERIOR
- Motorized locking bolt system will open the door automatically
- Designed to be installed between 16" o/c wall studs
- Approximately .44 cubic feet of storage space
- Key lock override system (2 keys included)
- Power override included
- Dual live motorized chrome bolts (3/4" dia.)
- Made of heavy duty gauge steel
- 2 Removable shelves
- Spring loaded door
- Flush digital keypad
- Door thickness is 5/8" formed steel
- Exterior Dimensions: 14-1/8" (W) x 18-1/4" (H) x 3-7/8" (D)
- Interior Dimensions: 14" (W) x 18-1/8" (H) x 3" (D)
- Flange Size: 16" (W) x 20 " (H)
- Anchor Holes: 3 per Side (6 Total)
- Cubic Inch: 0.44
- Weight: 28 Lbs.
User Manual
Click the image below to download the user manual
![]()
 Attention CA Residents: Prop 65 Warning
WARNING:
This product can expose you to chemicals which are known to the State of California to cause cancer, birth defects, or other reproductive harm. For more information, go to www.p65warnings.ca.gov.
Need more information?
Our staff are available to answer any questions you may have about this item
Our staff are available to answer any questions you may have about this item
Look Similar Items By Category
Customer Reviews
By valerie jacobs
Date: February 10, 2014
The safe is easy to install and use and looks nice and neat once installed. We would definitely recommend to our family & friends.
Rating:  [4 of 5 Stars!]
[4 of 5 Stars!]
By Michael Hoprich
Date: January 27, 2014
Excellent overall quality. Love the felt on the inside. The keypad is great but I like the fact you have 2 other options for opening the safe if the batteries in the keypad die. I'm not a very handy guy but I had this mounted in about an hour. If you want a wall safe, I guarantee you'll like this safe.
Rating:  [5 of 5 Stars!]
[5 of 5 Stars!]
By Robert S "Robert S"
Date: January 12, 2014
I just spent the entire day installing this safe and am not quite done with covering all tracks of the construction surgery due to all the suitable wall spaces in my old house having studs at considerably less than standard 16o.c. distance.That little contretemps aside, this product is first rate. Sturdy, easy to use (and to install, if you live in a modern house), this heavy safe looks and feels sturdy and crowbar-proof, yet has a pleasing interior thanks to a velvety interior cladding. Punch in your personal 4-digit code and the door springs open on its own and illuminates the safe interior through a hidden LED light. The effect is almost magic and very inviting. There is also a 6-digit override code in case you forget the 4-digit code. Both are easy to reprogram from their factory settings. While the locking mechanism requires 4 AA batteries to work, there is a secondary exterior battery compartment that can be used in the unlikely case that the interior batteries run out. You would have to ignore the low-battery warnings or not use the safe for a long time for that to happen. Finally, there is a set of rather odd-looking keys to open the safe the old-fashioned way if all of the above were to fail. My biggest worry at this minute is where to store these keys so I would find and identify them if ever needed, but in a place a burglar would not bother to look... I am thinking my safe at the bank.Now to some practical installation hints, as the instructions are very sparse in this respect. First, you need to find a suitable placement from a comfort point of view. The door hinges are on the right and cannot be switched. The safe requires a rectangular opening in the wall, 18-1/8 by 14-1/8 inches. 14 1/8 inches is the surface-to-surface distance between studs in standard construction, and you *will* need side studs to bolt the safe into.Next, you need to identify where the studs are in your preferred spot. A studfinder works best, but knocking the wall with your knuckles can also work if you have an ear for hollow vs. solid sounds. Once you ascertain the proper space, explore the supposedly hollow space between the two studs for any firebreaks (horizontal spacer studs), again with a studfinder or your knuckles and your ear. If you find one, you will likely want to place the safe immediately above it.Once you have a rough idea of the safe's location, make a small pilot hole with a drill, then stick a wire (or disassembled coathanger) into it to plumb the depth. The safe requires 3 3/4 unobstructed depth, measured from the wall surface facing the room. Assuming all is good so far, draw the outline of the required opening with light pencil on the wall. Next, drill pilot holes at 1 to 2 inches apart along the outline. You want to insure that there are no hidden obstacles anywhere. Small drill holes are a lot easier to patch up then a large hole. The pilot holes will also help you identify the exact location of stud edges and firebreak edge, if any. As you draw the final, verified outline of the opening, make sure that the angles are square! Ideally you have a helper hold the (heavy) safe against the wall you you run a pencil around its outline. A heavy, strong person might be able to do so without help in a pinch.Finally you are ready to cut. For regular sheetrock (gypsum board) used starting in the 1950s, a handsaw is best. Ideally you hold the business end of a household vacuum hose (without attachment) immediately below the saw blade as it works through the sheetrock, as this dust will otherwise have a way of coating every square inch of surface within sight. If, however, you have lath and plaster as I did in my old house, you will need an electric reciprocating saw (sawz-all) with a short, bimetal blade to cut cleanly through the hard gypsum and the wood slats. Err on the side to make the hole about 1/8 wider and taller than the outline of the safe. One more hint: Make a 3 x 3 hole in the center first, then peer around inside for any pipes or wires you may have missed. Flexible romex wire may likely and safely fit behind the safe, but pipes my force you to retreat and find an alternate location.Once you are done with the cutting, if you are lucky, the safe will pop in cleanly into your opening. If you are like me and made the opening too tight, you'll have to cut a little more. With the open safe fitting snug against the wall, mark the 3 drill holes on the left side against the left stud, and repeat the same with the 3 holes against the right stud. Drill holes smaller than the supplied bolts -- you can always re-drill with a larger bit if needed. Don't forget to add the supplied washers as you insert the bolts into the holes you drilled. You will need a socket wrench (I used 17 mm -- 5/8 or 11/16 *might* work, also) with a ratchet arm to do these bolts justice. Remove the velvet shelves while you do this.Once you are done and the safe is installed, vacuum it out and paint any damaged wall surface surrounding it though, if you were very careful, that may not be necessary. Enjoy!
Rating: [5 of 5 Stars!]
[5 of 5 Stars!]
By J. Sadler "Mr Mojo Risein"
Date: December 19, 2013
this is what the hotels have! if mounted between 16 center studs this safe is solid. I did a lot of research and I am very very happy with how this is built and how well the keypad and locking mech work. it even has a light in it. Don't waist your money on brands like first alert, read the reviews!
Rating: [5 of 5 Stars!]
[5 of 5 Stars!]
By Peter
Date: December 08, 2013
This safe was installed to store a handgun. It has adequate room for a couple of guns, mags and holster. Keypad works nicely. The safe pops open an inch when code is entered. I installed the safe a little tight and it didn't pop open like it was supposed to. Instead of taking it out and reinstalling, I just cut a small block of wood and drilled a hole and inserted a compression spring against the door. Works fine. More of a problem with my install than the unit.
Rating: [4 of 5 Stars!]
[4 of 5 Stars!]
By Pq40 "pq"
Date: November 17, 2013
well built although not fire proof, worth the cash---fits perfectly between studs, if there 16' center---naturally i had to sand and plain and whatever to fit safe but all in all it was pretty easy---bolts provided, not bad---easy to use---combo works just fine---did not appreciate 'made in china'---would not have bought it if i had known or read more, operator error---dumb to send back--instructions pretty clear and website has a video to make more clearer---arrived in good shape in excellent packaging
Rating: [5 of 5 Stars!]
[5 of 5 Stars!]